

easy greek chicken and potatoes
Greek-Inspired Lemon Chicken and Potatoes
Ingredients:
• For the Chicken and Potatoes:
• 4-6 bone-in, skin-on chicken thighs
• 1 ½ lbs Yukon Gold potatoes, cut into wedges
• ¼ cup extra virgin olive oil
• Juice of 2 lemons
• ½ cup chicken broth
• 1 tbsp Cindy’s Kitchen Meyer Lemon Vinaigrette
• 1 tbsp yellow mustard
• 1 tbsp Garlic Expressions dressing
• 1 tbsp minced garlic (fresh or jarred)
• Seasonings:
• 1 tsp Greek Freak seasoning blend
• 1 tsp dried parsley
• 1 tsp dried thyme
• 1 tsp New York Shwarma blend
• ½ tsp salt (or to taste)
• ½ tsp black pepper (or to taste)
• ½ tsp Julian French Onion seasoning (optional)
Instructions:
1. Preheat the Oven:
Preheat your oven to 425°F (220°C).
2. Prepare Marinade:
In a small bowl, whisk together the olive oil, lemon juice, chicken broth, Cindy’s Kitchen Meyer Lemon Vinaigrette, yellow mustard, Garlic Expressions, and minced garlic.
3. Season the Chicken:
Pat chicken thighs dry with a paper towel. Rub them generously with salt, pepper, and a mix of Greek Freak seasoning, dried parsley, thyme, and New York Shwarma blend.
4. Assemble in the Pan:
In a large baking dish, arrange the potato wedges in a single layer. Place the chicken thighs on top of the potatoes.
5. Add Marinade:
Pour the marinade over the chicken and potatoes, ensuring everything is well coated. Sprinkle with an optional dash of Julian French Onion seasoning.
6. Bake:
Bake in the preheated oven for 55-60 minutes. Baste the chicken and potatoes with the pan juices every 15-20 minutes for extra flavor.
7. Crisp the Chicken:
For crispy skin, remove the chicken thighs and broil them for 3-5 minutes. Return them to the dish and toss the potatoes to coat in the juices.
8. Serve:
Garnish with extra parsley or fresh herbs if desired. Serve hot, with pan juices drizzled over the chicken and potatoes.
This recipe brings a bright, tangy, and herbaceous flavor that pairs beautifully with the crisped chicken and tender potatoes!

Homemade Roasted Tomato Soup
Homemade Roasted Tomato Soup
Ingredients:
• 2 cans (28 oz) high-quality tomatoes (e.g., San Marzano or Bianco DiNapoli)
• 2 lbs Roma tomatoes, halved
• 1 cup sweet cherry tomatoes
• 1 yellow bell pepper, seeded and quartered
• 1 medium sweet onion, cut into wedges
• 6 garlic cloves, peeled
• 2 tbsp extra virgin olive oil (EVOO), plus more for drizzling
• 2 cups vegetable or chicken stock
• 1/2 cup 2% farm-fresh milk
• 1/3 cup freshly grated Parmesan cheese
• 1 tsp dried basil (or 1 tbsp fresh basil)
• 1 tbsp of fresh pesto (optional)
• Salt and freshly ground black pepper, to taste
• 1 tbsp sugar (optional, to balance acidity)
• Fresh basil leaves, for garnish
Instructions
1. Preheat the Oven
Preheat your oven to 400°F (200°C).
2. Roast the Vegetables
• Arrange the halved Roma tomatoes, cherry tomatoes, yellow pepper, onion wedges, and garlic cloves on a large baking sheet.
• Drizzle with olive oil, and season lightly with salt and pepper. Toss to coat.
• Roast for 25-30 minutes, or until the vegetables are soft and slightly caramelized.
3. Prepare the Soup Base
• In a large pot, heat 1 tablespoon of EVOO over medium heat. Add the canned tomatoes (with their juices) and bring to a simmer.
• Stir in the roasted vegetables and garlic. Add the stock and dried basil. Simmer gently for 10 minutes, stirring occasionally.
4. Blend the Soup
• Use a hand blender (immersion blender) to blend the soup until smooth. If you prefer a chunkier texture, blend partially or leave some chunks intact.
• Alternatively, blend in batches using a countertop blender (be cautious with hot liquids).
5. Finish the Soup
• Stir in the grated Parmesan cheese and milk. Adjust the consistency with additional stock or milk, if needed.
• Taste and adjust seasoning with salt, pepper, and sugar (if desired). Add a spoonful of pesto for depth, if using.
6. Serve
• Ladle the soup into bowls. Drizzle with a touch of EVOO and garnish with fresh basil leaves. Serve with crusty bread or grilled cheese on the side.
Enjoy your rich, flavorful tomato soup! The combination of roasted vegetables, high-quality canned tomatoes, and fresh milk makes it irresistibly creamy and comforting.


Chicken Fajitas: Restaurant Style
Ingredients:
Chicken Cutlets
Sliced 3 Sliced Peppers (Green, Yellow, Red) 1 Sliced Yellow Onion
2 tablespoons of Soy Sauce (I used GF) or Dale's Seasoning
2 tablespoons Mexican Spice Blend (cumin, oregano, garlic, chili, onion, roasted garlic, minced garlic & s/p)
optional: 1 teaspoon of honey
Fresh Limes, Squeezed
4 tablespoons light olive oil, or vegetable oil 1 tablespoon of butter
Preparation:
In a large bowl, mix together lime juice, soy sauce, spices, honey, and 1 tablespoon of oil.
Prep & Slice Chicken Cutlets.
Transfer Sliced Chicken Cutlets to the bowl to marinate for at least 15 minutes.
Add remaining oil & butter to a cast iron skillet over medium-high heat. Allow the pan to heat for at least 2 minutes.
Once heated, add Sliced Chicken in batches, searing on both sides.
After 4 minutes, or when chicken is halfway cooked: Add peppers & onions to the pan.
Cook until lightly sautéed.


Raisin bread pudding
Here’s a delightful recipe for classic Raisin Bread Pudding. This comforting dessert is perfect for using up stale bread and is wonderfully easy to make!
---
### Classic Raisin Bread Pudding
#### Ingredients
- 6 cups of day-old bread, cubed (white, brioche, or challah work well)
- 1 cup raisins (you can use golden or regular)
- 2 cups milk (or half-and-half for a richer pudding)
- 1/2 cup granulated sugar
- 4 large eggs
- 1 teaspoon vanilla extract
- 1 teaspoon ground cinnamon
- 1/4 teaspoon salt
- 1/4 cup unsalted butter, melted
- Optional: powdered sugar, for serving
#### Instructions
1. **Preheat the Oven:**
Preheat your oven to 350°F (175°C). Grease a 9x13-inch baking dish or a similar-sized casserole dish with butter.
2. **Prepare the Bread and Raisins:**
- In a large bowl, place the cubed bread and raise. Toss together and set aside while you prepare the custard.
3. **Make the Custard:**
- In a mixing bowl, whisk together the milk, sugar, eggs, vanilla extract, ground cinnamon, salt, and melted butter until well combined.
4. **Combine Bread and Custard:**
- Pour the custard mixture over the bread and raisins, gently folding it in to fully soak the bread. Let it sit for about 15-20 minutes, allowing the bread to absorb the custard.
5. **Transfer to Bake:**
- Pour the mixture into the prepared baking dish, spreading it evenly. Ensure that the bread is submerged in the custard as much as possible.
6. **Bake:**
- Bake in the preheated oven for 40-45 minutes, or until the top is golden brown and the pudding is set. A knife inserted in the center should come out clean.
7. **Cool and Serve:**
- Let the bread pudding cool for a few minutes before serving. Dust with powdered sugar if desired.
8. **Optional Serving Suggestions:**
- Serve warm, drizzled with caramel sauce, vanilla ice cream, or a dollop of whipped cream.
Enjoy your delicious Raisin Bread Pudding, a warm and comforting dessert that’s sure to please!

Faux Alice Springs Chicken
Here’s a delicious recipe for Faux Alice Springs Chicken inspired by the popular dish from Outback Steakhouse. This version features tender chicken breasts topped with honey mustard, sautéed mushrooms, crispy bacon, and melted cheese.
---
### Faux Alice Springs Chicken
#### Ingredients
**For the Chicken:**
- 4 boneless, skinless chicken breasts
- Salt and pepper, to taste
- 1 tablespoon olive oil
- 1 teaspoon garlic powder
- 1 teaspoon onion powder
- 1 cup sliced mushrooms
- 8 slices of cooked bacon, crumbled (use turkey bacon for a lighter version)
- 1 cup shredded Monterey Jack cheese
- 1 cup shredded cheddar cheese
**For the Honey Mustard Sauce:**
- 1/4 cup Dijon mustard
- 1/4 cup honey
- 1 tablespoon mayonnaise
- 1 tablespoon apple cider vinegar
- Salt and pepper, to taste
#### Instructions
1. **Preheat the Oven:**
Preheat your oven to 375°F (190°C).
2. **Prepare the Honey Mustard Sauce:**
- In a small bowl, mix together the Dijon mustard, honey, mayonnaise, apple cider vinegar, salt, and pepper until well combined. Set aside.
3. **Season the Chicken:**
- Pat the chicken breasts dry with paper towels. Season both sides with salt, pepper, garlic powder, and onion powder.
4. **Cook the Chicken:**
- In a large oven-safe skillet, heat the olive oil over medium-high heat. Add the chicken breasts and sear them for about 5-7 minutes on each side, or until golden brown. Remove the chicken from the skillet and set aside.
5. **Sauté the Mushrooms:**
- In the same skillet, add the sliced mushrooms. Sauté for about 3-4 minutes until they are tender and any liquid has evaporated.
6. **Assemble the Dish:**
- Return the chicken to the skillet. Drizzle the honey mustard sauce generously over each chicken breast. Top with sautéed mushrooms, crumbled bacon, and a mix of Monterey Jack and cheddar cheese.
7. **Bake:**
- Transfer the skillet to the preheated oven and bake for 15-20 minutes, or until the chicken is cooked through (internal temperature of 165°F / 75°C) and the cheese is melted and bubbly.
8. **Serve:**
- Remove from the oven and let rest for a few minutes before serving. Garnish with fresh parsley if desired.
Enjoy your Faux Alice Springs Chicken with your favorite sides, like a crisp salad or roasted vegetables!

Mock Halal guys chicken bowls
### Halal Guys Chicken Bowl with Saffron Rice and Garlicky Naan
#### Ingredients
**For the Chicken:**
- 1.5 lbs chicken thighs, boneless and skinless
- 3 tablespoons olive oil
- 2 tablespoons vinegar (white or apple cider)
- 2 teaspoons ground cumin
- 2 teaspoons ground coriander
- 1 teaspoon paprika
- 1/2 teaspoon cayenne pepper (optional, for heat)
- 1 teaspoon garlic powder
- 1 teaspoon onion powder
- Salt and pepper, to taste
**For the Saffron Rice:**
- 2 cups basmati rice
- 4 cups water or chicken broth
- 1/4 teaspoon saffron threads
- 2 tablespoons butter
- Salt, to taste
**For the Toppings:**
- 2 cups shredded iceberg lettuce
- 1 cup chopped tomatoes
- White sauce (recipe below)
**For the White Sauce:**
- 1/2 cup mayonnaise
- 1/2 cup plain yogurt
- 2 cloves garlic, minced
- 1 tablespoon lemon juice
- Salt and pepper, to taste
**For the Garlicky Naan:**
- 4 naan breads
- 4 tablespoons butter, melted
- 2 cloves garlic, minced
- 1 tablespoon fresh cilantro, chopped (optional)
#### Instructions
1. **Marinate the Chicken:**
- In a large bowl, mix olive oil, vinegar, cumin, coriander, paprika, cayenne pepper, garlic powder, onion powder, salt, and pepper.
- Add the chicken thighs to the marinade, ensuring they are well coated. Cover and refrigerate for at least 1 hour (or overnight for best flavor).
2. **Prepare the Saffron Rice:**
- Rinse the basmati rice under cold water until the water runs clear. Drain well.
- In a medium saucepan, bring water (or broth) to a boil. Add the saffron threads and let them steep for a few minutes.
- Stir in the rice, butter, and salt. Reduce heat to low, cover, and simmer for 15-20 minutes until the rice is tender and the liquid is absorbed. Fluff with a fork.
3. **Cook the Chicken:**
- Heat a grill pan or skillet over medium-high heat. Cook the marinated chicken thighs for about 5-7 minutes on each side, or until fully cooked and juices run clear. Remove from heat and let rest for a few minutes before chopping into bite-sized pieces.
4. **Make the White Sauce:**
- In a small bowl, combine mayonnaise, yogurt, minced garlic, lemon juice, salt, and pepper. Mix well and adjust salt to taste. Set aside.
5. **Prepare the Garlicky Naan:**
- In a small bowl, mix melted butter with minced garlic. Brush the garlic butter over the naan breads.
- Optional: Sprinkle chopped cilantro over the naan for extra flavor.
- Heat the naan in a skillet or oven for about 2-3 minutes until warm and slightly crispy.
6. **Assemble the Bowl:**
- In a bowl, layer the saffron rice, topped with chopped chicken, shredded lettuce, chopped tomatoes, and a generous drizzle of white sauce.
7. **Serve:**
- Serve the chicken bowls alongside garlicky naan for a delightful meal.
Enjoy your homemade Halal Guys-inspired chicken bowl with all the vibrant flavors!

Whole Roasted Chicken with Orange and Root Vegetables
Here’s a delicious recipe for a whole roasted fall chicken stuffed with orange and accompanied by roasted root vegetables. Perfect for autumn gatherings!
Ingredients
**For the Chicken:**
- 1 whole chicken (3-4 lbs)
- 2 oranges, one cut into wedges, the other juiced
- Salt, to taste
- Pepper, to taste
- 1 tablespoon lemon pepper seasoning
- 1 cup onion confit
- 2 sprigs fresh rosemary, chopped
- 2 sprigs fresh thyme, chopped
- 1/2 cup orange marmalade
- Olive oil
**For the Root Vegetables:**
- 2 cups Brussels sprouts, halved
- 2 parsnips, peeled and cut into 1-inch pieces
- 2 carrots, peeled and cut into 1-inch pieces
- 2 apples, cored and cut into wedges
- 1 onion, cut into wedges
- Salt and pepper, to taste
- Olive oil, for drizzling
#### Instructions
1. **Preheat the Oven:**
Preheat your oven to 425°F (220°C).
2. **Prepare the Chicken:**
- Pat the chicken dry with paper towels. This helps achieve crispy skin.
- Season the cavity of the chicken with salt and pepper. Stuff the cavity with orange wedges.
- In a bowl, mix the onion confit, rosemary, thyme, and lemon pepper seasoning. Rub this mixture all over the chicken, ensuring it’s well coated.
- Drizzle the chicken with olive oil and season again with salt and pepper.
3. **Prepare the Vegetables:**
- In a large bowl, combine Brussels sprouts, parsnips, carrots, apples, and onion. Drizzle with olive oil, and season with salt and pepper. Toss to coat evenly.
4. **Roast the Chicken:**
- Place the chicken in a large roasting pan. Surround it with the prepared root vegetables.
- Brush the chicken with orange marmalade, creating a delicious glaze.
- Roast in the preheated oven for about 1 hour and 15 minutes, or until the internal temperature reaches 165°F (75°C). Baste the chicken with the pan juices halfway through for extra flavor.
5. **Rest and Serve:**
- Once cooked, remove the chicken from the oven and let it rest for 15 minutes before carving.
- Serve the roasted chicken alongside the caramelized root vegetables, drizzled with the pan juices.
Enjoy this flavorful fall-inspired dish, perfect for any gathering!

White chocolate strawberry cheesecake (ft. lemony-honey goat cheese)
Ingredients:
- 2 cups crushed graham crackers
- 1/3 cup melted butter
- 5 blocks of cream cheese, softened
- 1/2 cup sugar
- 3 eggs
- 1 tsp vanilla extract and extract
- 1 cup white chocolate, melted
- 1 cup fresh strawberries, chopped
#### Instructions:
1. **Prepare the Crust:**
- Preheat your oven to 350°F (175°C).
- In a bowl, mix the crushed graham crackers with melted butter.
- Press the mixture into the bottom of a springform pan and bake for 10 minutes.
2. **Prepare the Cheesecake Batter:**
- In a large bowl, beat the cream cheese and sugar until smooth.
- Add the eggs one at a time, mixing well after each addition.
- Stir in the vanilla extract.
- Fold in the melted white chocolate and chopped strawberries.
3. **Baking Process:**
- Preheat the oven to 325°F (160°C).
- Wrap the springform pan with aluminum foil to prevent water from seeping in.
- Place the pan in a larger, deep baking dish filled with warm water (water bath).
- Pour the cheesecake batter into the prepared crust.
- Bake the cheesecake for 1 hour and 15 minutes.
4. **Cooling Process:**
- After baking, turn off the oven and let the cheesecake cool inside for an hour to prevent cracks.
- Once cooled in the oven, remove the cheesecake and let it cool to room temperature.
- Refrigerate the cheesecake for a few hours to set.
5. **Serve and Enjoy:**
- Once set, slice the White Chocolate Strawberry Cheesecake and serve chilled.
6. **Garnish:**
- You can garnish with fresh strawberries or a drizzle of melted white chocolate for an extra touch.
Enjoy creating this delicious and indulgent White Chocolate Strawberry Cheesecake for your blog!

a classic: Ratatouille
Summer Classic: Ratatouille
Ingredients:
- 2 summer squash
- 2 zucchinis
- 3 eggplants
- 4-5 roma tomatoes
- 1 can of good crushed tomatoes
- 5 cloves of garlic, crushed
- Chopped basil
- Herbs and seasonings of your choice
- High-quality extra virgin olive oil (EVOO)
Instructions:
1. Preheat the oven to 375°F (190°C).
2. Slice the summer squash, zucchinis, eggplants, and roma tomatoes into evenly sized rounds.
3. In a bowl, mix the crushed garlic with the chopped basil, herbs, and seasonings of your choice. This will be your seasoning mix.
4. Drizzle some EVOO in the bottom of a baking dish. Arrange the sliced vegetables in an overlapping pattern in the dish.
5. Pour the can of crushed tomatoes over the vegetables.
6. Sprinkle the seasoning mix evenly over the vegetables.
7. Drizzle more EVOO over the top of the vegetables.
8. Cover the dish with aluminum foil or a lid.
9. Bake in the preheated oven for about 45-60 minutes, or until the vegetables are tender.
10. Remove the cover and bake for an additional 10-15 minutes to allow the top to brown slightly.
11. Serve hot as a delicious side dish or as a main course with crusty bread.
Enjoy your flavorful ratatouille :)

“The Best Cinnamon Rolls I’ve Ever Had”
“Best Cinnamon Rolls I’ve Ever Had”
“The Best Cinnamon Rolls I’ve Ever Had” – My Sixty-Six-Year-Old Mother
This recipe is based on the Extra Fluffy Cinnamon Rolls recipe at Bon Appetite. I made a few tweaks to the recipe. I made major adjustments to content of milk fat and variation in seasonings. I have made Cinnamon rolls at least five times before, and I was told this recipe has solid, hearty bones to be considered the best. I really enjoyed the tips from the writer and recipe creator, Isa Zapata, who utilized the Chinese method of precooking starch and liquid for added hydration and moisture. This method, Tangzhong, is what particularly stood out to me as a self-proclaimed food scientist. Tangzhong lends itself to the dough as a conditioner and remains the secret to a super-soft dough. Well, I keep no secrets and I do find this recipe to be extra ordinary in its steps and overall execution.
THE DOUGH
- 2¼ cups 2% milk, divided
- 5¾ cups (719 g) all-purpose flour, divided
- 1 large egg
- 1 ¼-oz. envelope instant, rapid yeast (about 2¼ tsp.)
- ⅓ cup (67 g) granulated sugar
- 1 Tbsp. Diamond Crystal or 1¾ tsp. Morton kosher salt
- ½ cup (1 stick) unsalted butter, room temperature, cut into pieces
THE FILLING
- ½ cup (1 stick) unsalted butter
- 1 cup (packed; 200 g) dark brown sugar
- 2 Tbsp. ground cinnamon
- 1 tsp. of vanilla bean paste
- 2 Tbsp. half and half
- ½ tsp. Diamond Crystal or ¼ tsp. Morton kosher salt
FROSTING
- 4 Tbsp. unsalted butter, room temperature, plus more for pans
- 8 tablespoons of cream cheese, room temperature
- 1 cups powdered sugar (or to taste)
- 1 Tbsp. (or more) half and half or 2% milk
- ¼ tsp. Diamond Crystal or Morton kosher salt
This recipe instructions are verbatim from Bon Appetite and lovingly written and perfected by Zaynah Issa
RECIPE PREPARATION
DOUGH
Whisk ¾ cup 2% milk and ¼ cup (31 g) all-purpose flour in a medium saucepan until smooth. Place saucepan over medium heat and cook, whisking constantly, until mixture is thickened and whisk lines are visible on bottom of pan, about 2 minutes. Scrape tangzhong into the bowl of a stand mixer and let cool.
Add 1 large egg, one ¼-oz. envelope instant yeast (about 2¼ tsp.), ⅓ cup (67 g) granulated sugar, 1 Tbsp. Diamond Crystal or 1¾ tsp. Morton kosher salt, and remaining 1½ cups 2% milk to tangzhong and whisk to combine. Add remaining 5½ cups (688 g) all-purpose flour. Fit bowl onto stand mixer; fit mixer with dough hook attachment. Mix on low speed until combined, about 1 minute. Increase speed to medium-low and mix, scraping down sides of bowl occasionally, until dough is smooth and elastic, 18–24 minutes. Pinch off a golf-ball-size piece of dough and stretch between your fingers as thin as possible without breaking. If you can see light through the dough, it’s ready. If not, continue mixing a few more minutes, then try again.
Add ½ cup (1 stick) unsalted butter, room temperature, cut into pieces, to dough and mix on medium speed until incorporated, about 2 minutes. Continue mixing until dough pulls away cleanly from sides of bowl and is no longer tacky to the touch, 5–7 minutes longer. Remove bowl from mixer and cover with a damp kitchen towel. Let sit in a warm spot until doubled in volume, 60–90 minutes.
FILLING, ASSEMBLY, AND FROSTING
While the dough is rising, cook ½ cup (1 stick) unsalted butter in a small saucepan over medium heat, stirring occasionally, until butter foams and milk solids turn dark amber, about 4 minutes. Transfer to a heatproof bowl and let cool slightly. Add 1 cup (packed; 200 g) dark brown sugar, 2 Tbsp. ground cinnamon, 2 Tbsp. half and half, 1 tablespoon of vanilla bean paste and ½ tsp. Diamond Crystal or ¼ tsp. Morton kosher salt to butter and mix to combine.
Butter two 9"-diameter cake pans. Punch down dough and transfer to a lightly floured surface. Stretch dough into a rough rectangle; if dough feels stiff, let sit 5–10 minutes to allow gluten to relax. Arrange dough with short side facing you and roll out to a 24x13" rectangle. Spread filling over dough in an even layer.
Starting at edge closest to you, tightly roll up dough into a log; roll log seam side down. Using a sharp serrated knife and long sawing motions, trim ends of log; discard. Using serrated knife or, preferably, unflavored dental floss, cut log in half crosswise, then cut each half into 6 equal rounds. (If using dental floss, slide floss underneath dough, then cross over top and pull ends through.) Nestle 6 rounds, cut side down, in each prepared cake pan. Cover with damp kitchen towels and let sit in a warm spot until doubled in volume, about 30–50 minutes.
Place a rack in middle of oven; preheat to 350°. Bake rolls until golden on top and puffed (don’t be alarmed if they rise dramatically in the center), 25–30 minutes.
Meanwhile, using an electric mixer on medium speed or a whisk, beat 4 Tbsp. unsalted butter, room temperature, and 8 tablespoons of cream cheese, room temperature, in a large bowl, scraping down sides of bowl as needed, until combined. Add 1 of powdered sugar, 1 Tbsp. half and half, 1 tablespoon of vanilla bean paste and ¼ tsp. Diamond Crystal or Morton kosher salt and beat until mixture is smooth and sugar is incorporated. Taste and beat in more powdered sugar (up to ¾ cup) if desired. Thin with more cream as needed, a teaspoonful at a time, until frosting is thick but spreadable.
Let cinnamon rolls cool in pan 5 minutes; spread frosting over.
Recipe based on Zaynab Issa’s Extra Fluffy Cinnamon Rolls
This article originally appeared on Bon Appetit

Reese’s Inspired Banana Bread: Peanut Butter Crunch Gluten Free Banana Bread
Reese’s Inspired Banana Bread: Peanut Butter Crunch Gluten Free Banana Bread 🍌🍫😮💨
2 cups gluten free flour (Kings Arthur)
1/2 cups coconut sugar
1 1/2 teaspoons vanilla extract
1 tablespoon of vanilla paste
1 stick of plant based butter (vegan, melted)
1/4 cup PB2 powder
4 very ripe bananas
1 teaspoons baking powder
1 teaspoons baking soda
Pinch of salt
Peanut Butter Crunch Topping:
one packet of Skippy’s Organic Peanut Butter
1/4 cup of vegan chocolate chips
sprinkle coconut sugar
Oven at 350°, spray pan, and mix all ingredients but the Peanut Butter Crunch Topping!
Bake for 35-45 minutes or until done!

the easiest meal: slow cooker carnitas
Slow Cooker Carnitas
I really do not have much to say about these slow cooker carnitas besides how easy they are to make. My biggest pet peeve is when someone complains they do NOT have the time for cooking and/or they aren’t “good at it”. Cooking is an art and hobby just like anything else, you become good the more you practice and put yourself out there. You gotta explore and figure out your groove.
Well, these slow cooker carnitas are for those who may not like cooking, hate the clean-up, or simply do not have the time, money, or resources to cook crazy wild meals.
This is stupid simple to make and requires no formal background, education, or even passion for cooking. All you need is patience and a few ingredients. I really hope this inspires men and women, alike, who have putt off cooking due to fear of difficulty or uncertainty, that they can cook and it can be damn delicious!
And as a former vegan, vegetarian and yup, you guessed it, pescatarian for over 10 years, I love these carnitas. Sue me! I know pigs can run 7-minute miles, well I run a 10-minute mile now. Lets look past that…. Here’s the recipe!
- 4 LBS of Boston Butt Roast, Boneless
- 2 Limes
- ½ cup of fresh orange juice
- 1 cup of low sodium chicken broth
- Salt & Pepper
- 1 teaspoon of Oregano
- ½ cup of chopped onion
- 5 smashes cloves of garlic
- Dash of garlic & onion powder
This is so dang simple but for those who need it:
1. Put every ingredient above in slow cooker
2. Turn on slow cooker (on low setting)
3. Cook for 8-10 hours (if on high, 4 hours)
4. Once its done cooking, turn off and remove meat from fat
5. Turn oven on Broil
6. Transfer meat to lined baking sheet and drizzle two tablespoons of reserved liquid on top
7. Broil on high for 5 minutes or until crispy! And Enjoy!!
I hope y’all enjoy this recipe! It’s super flavorful and you can really add whatever you like to the crockpot! I made this with homemade tortillas and my whole family raved about it :)

you scream, I scream, we all scream for: Strawberry Shortcake ice cream crunch
strawberry shortcake ice cream cake
This recipe is very sentimental to me for one reason and one reason only: Red Bone Alley’s Ice Cream Truck in Florence, South Carolina.
For those who were not blessed and privileged enough to grow up in the Pearl of the Pee Dee, otherwise known as the Magic City, but more commonly refer to as Florence, South Carolina, then my apologies.
My hometown, Florence, South Carolina, is a quaint small southern town that has a very special restaurant, Red Bone Alley, that transients time and space. When you walk into Red Bone Alley, you immediately forget you are in Florence, South Carolina. You are transported to Charleston, South Carolina’s rainbow row. As a kid, I was not only transfixed on the multi-story landscape of Charleston, South Carolina, but also their seating area by an Ice Cream truck.
Red Bone Alley had sets, like from your high school theater department but a million times better, for each seating area. My favorite was by *in all caps to signify importance* The Ice Cream Truck. This was a vintage Ice Cream Truck with a freezer in it for kids to freely get ice cream.
I remember many times getting more than one ice cream bar, and I would always get the strawberry crunch bar by Good Humor. My apologies to former owner of Red Bone Alley and neighbor, Dale Barth, for being a kid with limited impulse control and childhood obesity. Regardless, this recipe is inspired by my childhood. I hope y’all try it and create your own special memories to this sweet dessert that screams summer :)
Ingredients:
- 1 28 oz. tub of Strawberry Ice cream (Good quality, I prefer Häagen-Dazs)
- 1 28 oz. tub of Vanilla Ice cream
- 2 packages of Golden Oreos
- 1 stick of unsalted butter
- ½ cup of strawberry preserves (good quality, less sugar)
- 1 bag of freeze-dried strawberries
- Fresh strawberries
1. Line a springform pan with plastic wrap (this helps with clean-up and ease of removal for serving)
2. Melt stick of butter in microwave, covered, for about 45 secs or until melted!
3. Put one package of the Golden Oreos in a bag and crush until texture is fine, sand like (I used a mallet but if you are mad at your boyfriend, use your fists)
4. Once Golden Oreos are crushed (more than your hopes and dreams), add melted butter and mix until incorporated.
5. Place mixture in lined springform pan, pressing down to make a crust.
6. Add ¼ cup of strawberry preserves on top of crust.
7. Add your slightly melted strawberry ice cream to pan until even. The trick is to let ice cream sit out for about 15-30 minutes to become soften and spreadable.
8. Once strawberry layer has been achieved, add freshly chopped strawberries and preserves!
9. Get another bag, crush Golden Oreos and Freeze-Dried Strawberries together (no butter though) until texture looks like pebbles or small rocks.
10. Sprinkle the strawberry crunch layer on top of strawberry preserves and chopped strawberries!
11. Add vanilla ice cream (again, make sure its soft enough to spread on-top)
12. Lastly, add your remaining strawberries, strawberry preserves, and strawberry crunch.
13. Freeze for 6-8 hours, thaw for 10 minutes before serving and enjoy!
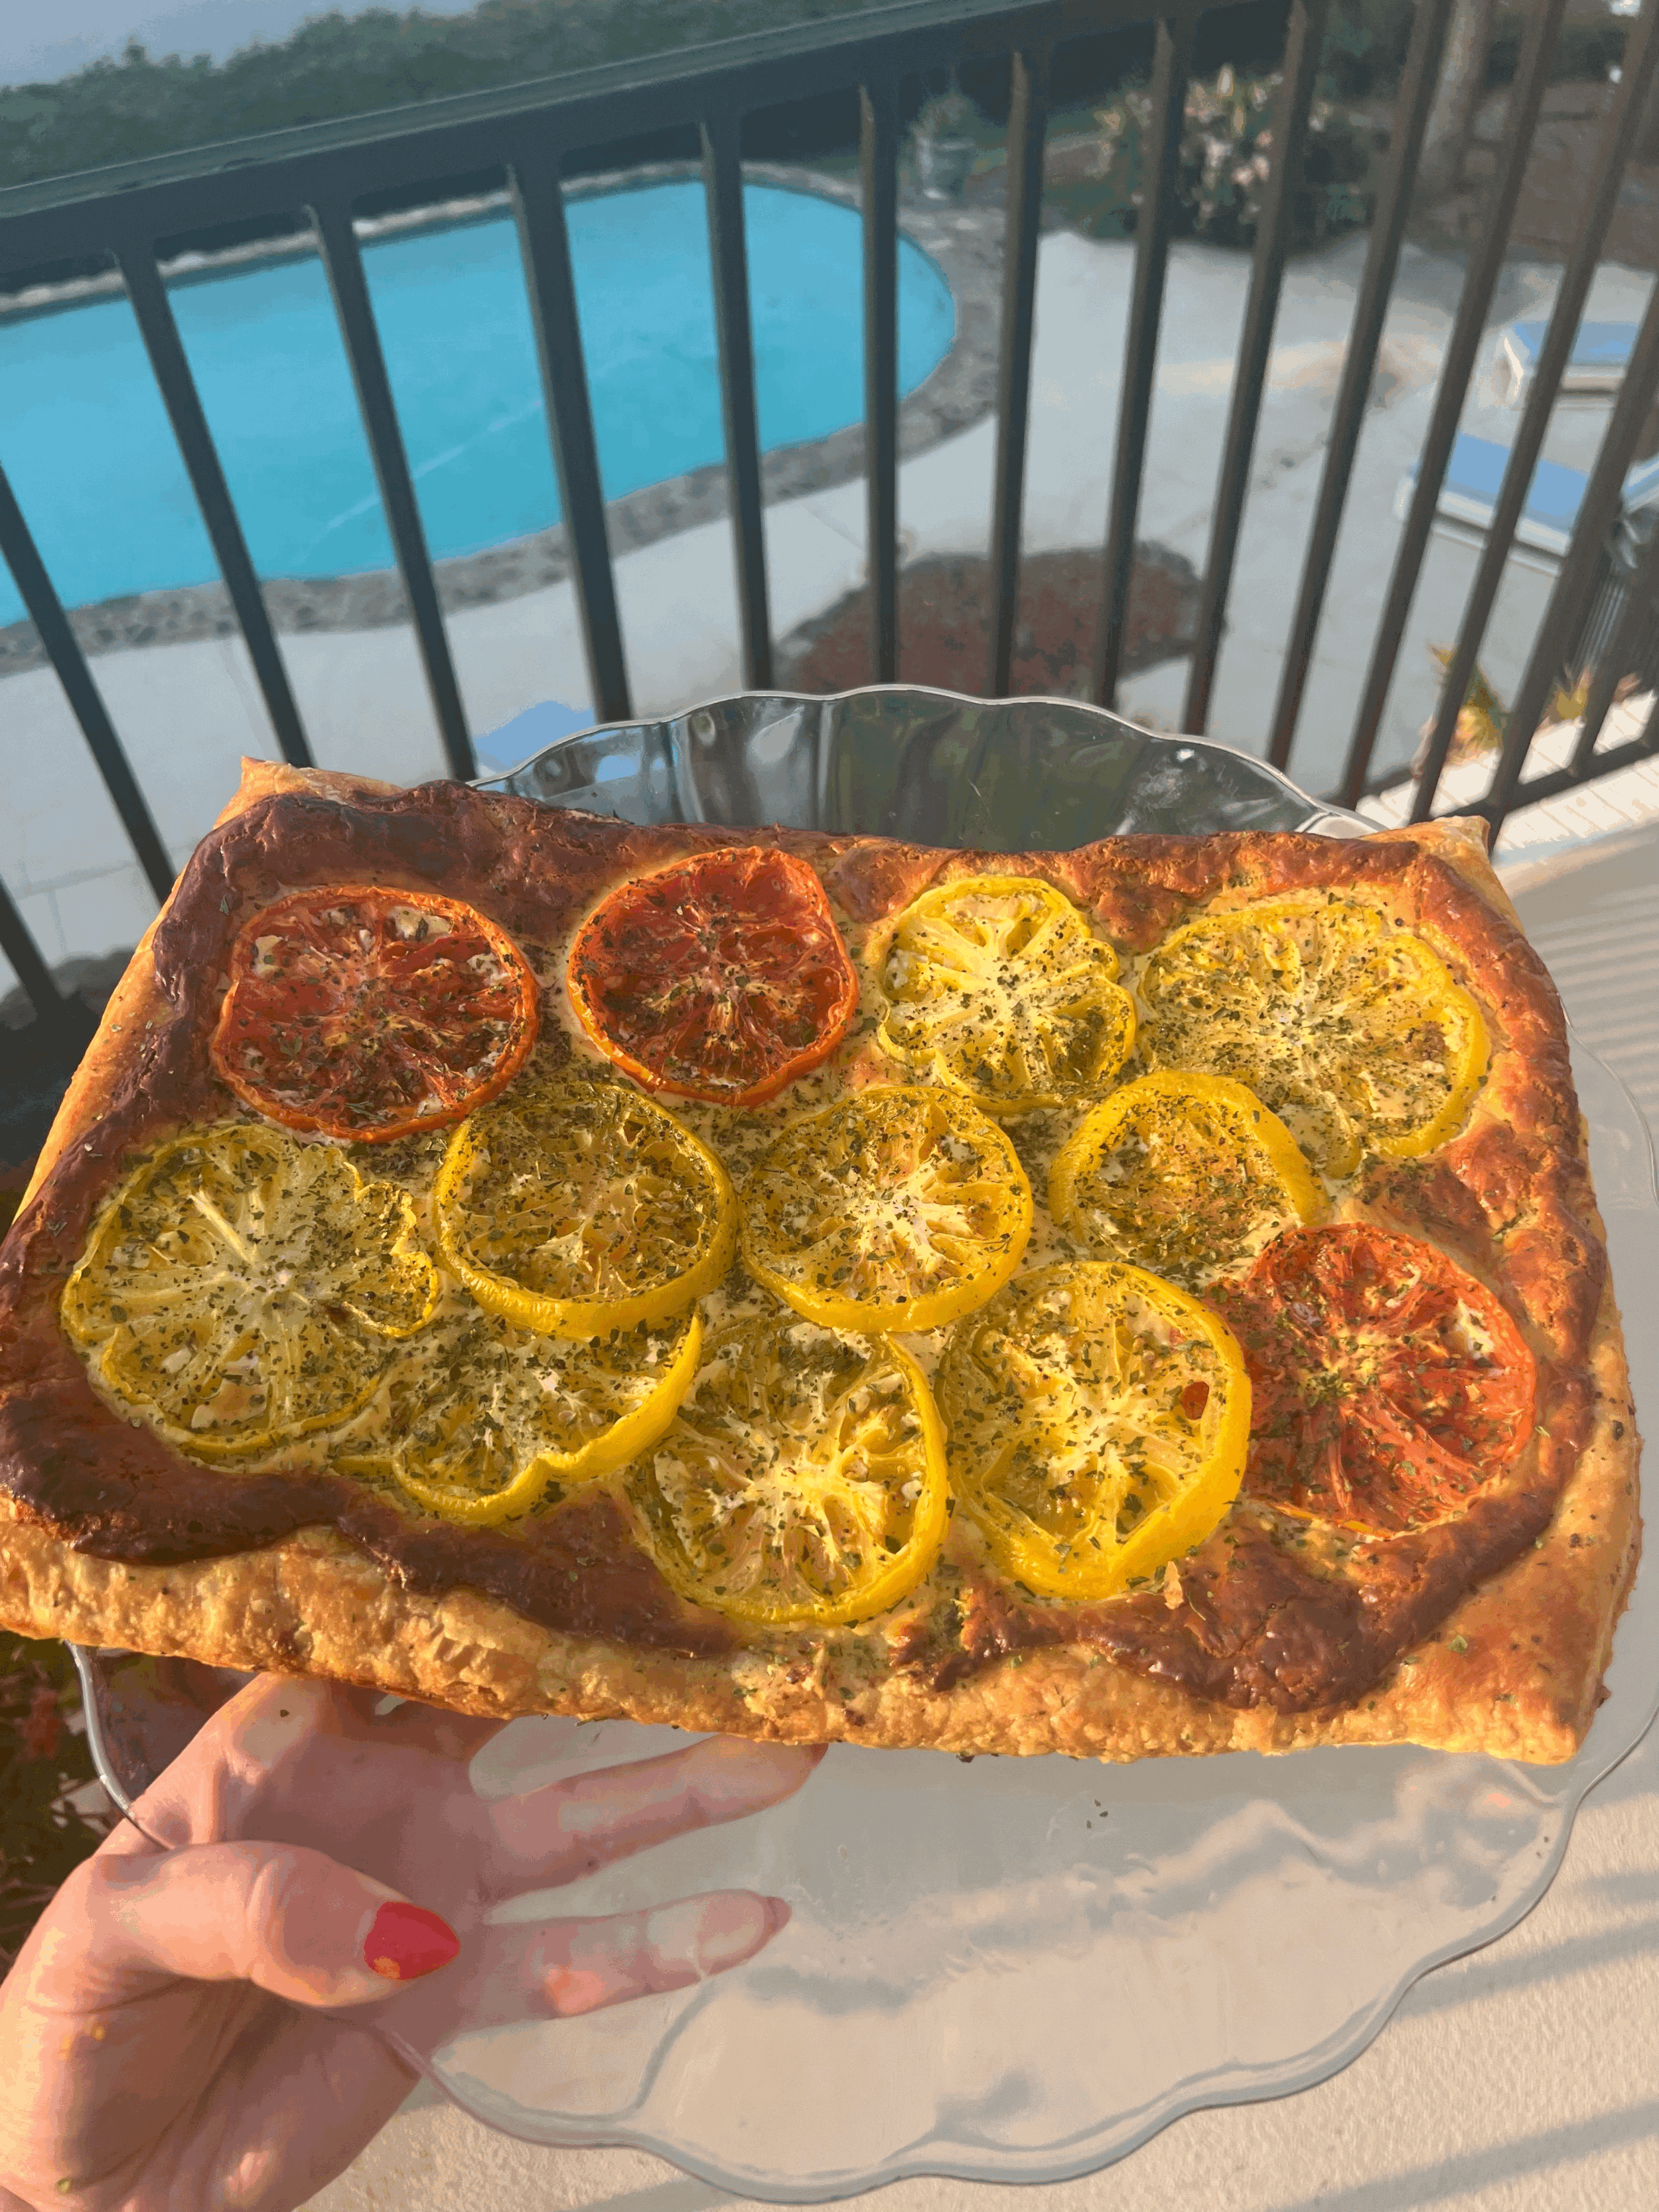
did someone say summer? tomato tart
Tomato Tart
Tomato Tart Recipe:
· 1 package of frozen and thawed puff pastry
· 5 heirloom tomatoes
· 1 package of garlic and herb Boursin Cheese
· 1 egg
· ½ cup of grated parm
· 1 tablespoon of Duke’s Mayo
· ¼ cup of Ricotta Cheese (drained)
· Balsamic Vinegar or Glaze
· Salt & pepper
· Garlic Powder
· Dehydrated Basil
Tomato Tart Cooking Instructions!
1. Turn oven on 375 degrees.
2. Slice tomatoes and pat dry!
3. Place sliced tomatoes on clean and dry paper towel and salt and pepper for 15 minutes (or until liquid gets released)
4. Gently unroll puff pastry and score a border around the edges (lightly make a frame or border) & lightly fork the middle (these aids in excessive puffiness during baking)
5. Lightly brush with egg wash (save remaining egg)
6. Mix together remaining egg, bourisn cheese, parm, balsamic, mayo, ricotta cheese and seasonings.
7. Place cheese mixture on tart and gently spread in the center of tart (do not spread past the “faux” border)
8. Place tomatoes on tart, season on top!
9. Place in oven for 35-40 minutes or until golden and bubbly!
10. Let rest for 5 minutes or so, and enjoy!
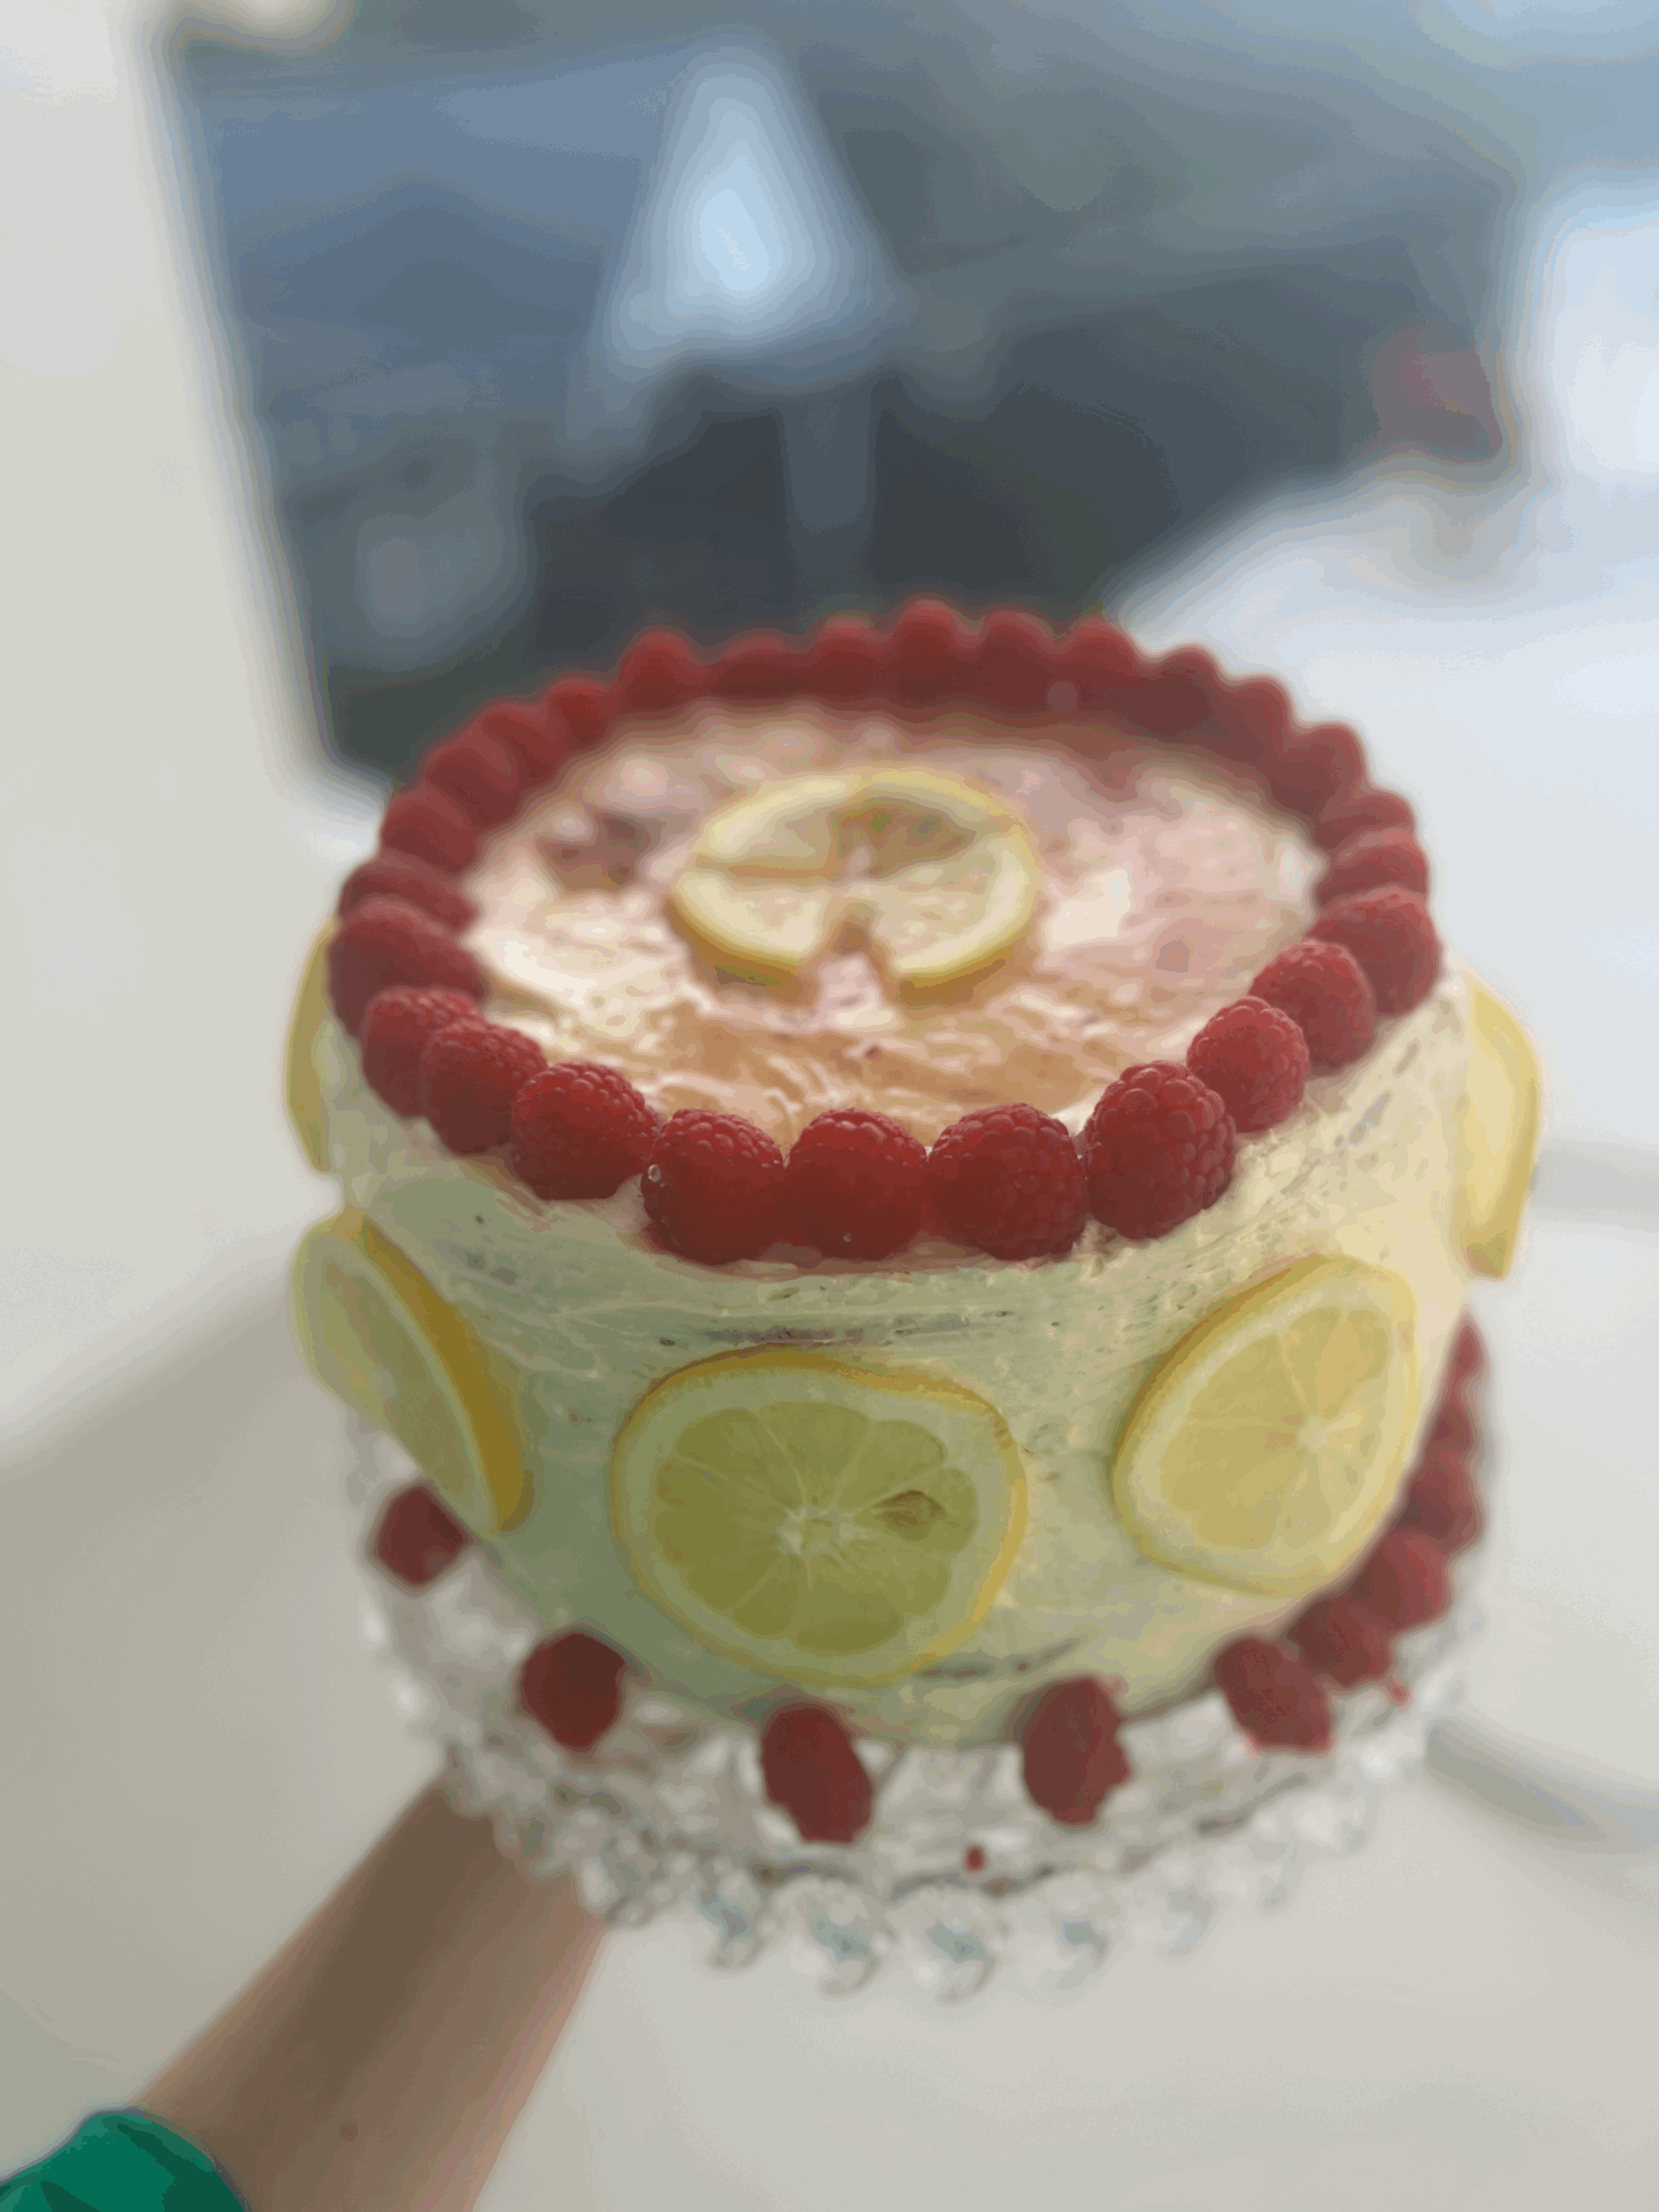
Easy peasy lemon squeezy raspberry layered cake
Easy Peasy Lemon Squeezy Raspberry Layered Cake
Okay, I’m back again… maybe the Adderall is hitting differently this morning or perhaps, I am still on a sugar rush from this cake last night. Who knows? Being a woman is difficult and I have little time to explain or try to figure out my moods or energy levels on a Monday.
But what I do have time for is this delicious (I will not say moist, because the internet has deemed that word “cringe” or whatever, but it is not dense or dry) and fluffy cake. It has the perfect amount of citrus and sweetness that will make you go back for more. I think it’s perfect but maybe that’s just me… maybe you should try out yourself… that would be crazy.
ANYWAYS!! here’s the recipe, it’s based off Bon Appetite’s Lemon Curd Lemon Cake (February, 1999) made lovingly by Selema Brown Morrison. Although her recipe is pretty dang flawless, I figured a few tweaks would be well loved and appreciated! You can get store-bought curd and raspberry preserves if ya like! I included some recommendations for some brands. Happy baking!
Easy Peasy Lemon Squeeze Raspberry Layered Cake Recipe:
350 degrees, butter and flour (I use spray, like do not make things difficult for yourself), line with parchment paper 3 (or 4, somehow, I got 4 cakes out of this recipe) 9’inch round cake pans
Cake: Dry Ingredients
1 ½ cups of cake flour
½ cups of white sugar
2 and ½ teaspoons of baking powder
¾ teaspoons of salt
1 and ½ teaspoons of grated lemon peel (honestly, no one measures this but just make sure you do NOT peel the bitter pith of the lemon)
Cake: Wet Ingredients PART 1
4 egg yolks
2 teaspoons of vanilla extract
1 tablespoon of vanilla bean paste
*optional* a little dash of almond extract (this really to your likening, some people hate almond flavor but I personally like a hint)
1 tablespoon of lemon paste
¼ cup of sour cream (or Greek yogurt, if you fancy.. I really )
½ cup of lemon curd
¼ cup of vegetable oil
¼ cup of orange juice
ADD THESE INGRENDIENTS IN A BOWL TOGETHER AND GENTLY MIX.
Cake: Wet Ingredients PART 2
(Stand Mixer, Whisk Attachment, or Arms of Steel needed)
8 egg whites
¼ teaspoon of cream of tartar
1 cup of sugar
1. Mix the wet ingredients (part 1) and dry ingredients together in a bowl!
2. Beat egg whites in another bowl.
3. Once egg whites get to soft peaks, slowly add sugar until stiff peaks form.
4. Gently fold in egg white mixture to the other mixture (we still want airy cakes, do not over mix)
5. Scoop mixture into prepared cake pans
6. Bake for 15-20 minutes on middle rack until baked through, lightly golden on top (darker pans cook faster, some ovens cook faster. This is not the time to leave the kitchen)
FOR LEMON CURD:
This is for people who have the time to make it. Honestly many store-bought ones are just as fine, and I really see no issue with cutting a few corners. These store-bought brands are great (Tiptree Lemon Curd or Bonne Maman’s Lemon Curd). I do not mess around with modifications so this Lemon Curd is verbatim from Bon Appetite.
FOR LEMON CURD:
2 and 1/3 cups sugar
2 teaspoons cornstarch
1 cup fresh lemon juice
4 large eggs
4 large egg yolks
3/4 cup (1 1/2 sticks) unsalted butter, cut into 1/2-inch pieces
Combine 2 1/3 cups sugar and 2 teaspoons cornstarch in heavy medium saucepan.
Gradually whisk in fresh lemon juice.
Whisk in eggs and yolks; add butter.
Whisk over medium heat until curd thickens and boils, about 12 minutes.
Pour into medium bowl.
Refrigerate until cold, at least 5 hours.
DO AHEAD Can be prepared 1 week ahead. Cover and keep refrigerated.
For Faux Wedding-Style Buttercream Icing:
4 sticks of butter
6 cups of confectioner sugar
1 tablespoon of Lemon Paste
2 teaspoons of vanilla extract
1 tablespoon of Vanilla Bean Paste
1. Whip the butter until very airy (be careful not to overwhip but whip on med-high for 3 minutes)
2. Add confectioner’s sugar (the measurement is subjective but until it turns until the icing you like)
3. Add your paste, extracts etc. (whatever flavoring you fancy)
To assembly cake:
1. Put down a dollop of icing on cake stand to help cakes stay
2. Put some icing in a plastic bag for a mock icing bag (snip end with scissors)
3. Put first cake down
4. Make a cake border with icing
5. Put one scoop of icing in middle and spread
6. Add lemon curd and raspberry preserves (Bonne Mamam) in the middle
7. Repeat steps 3 through 6 until complete
8. Garnish with fresh raspberries & sliced lemons
This recipe was so much fun to make and I am pretty proud of it. I hope y’all enjoy!
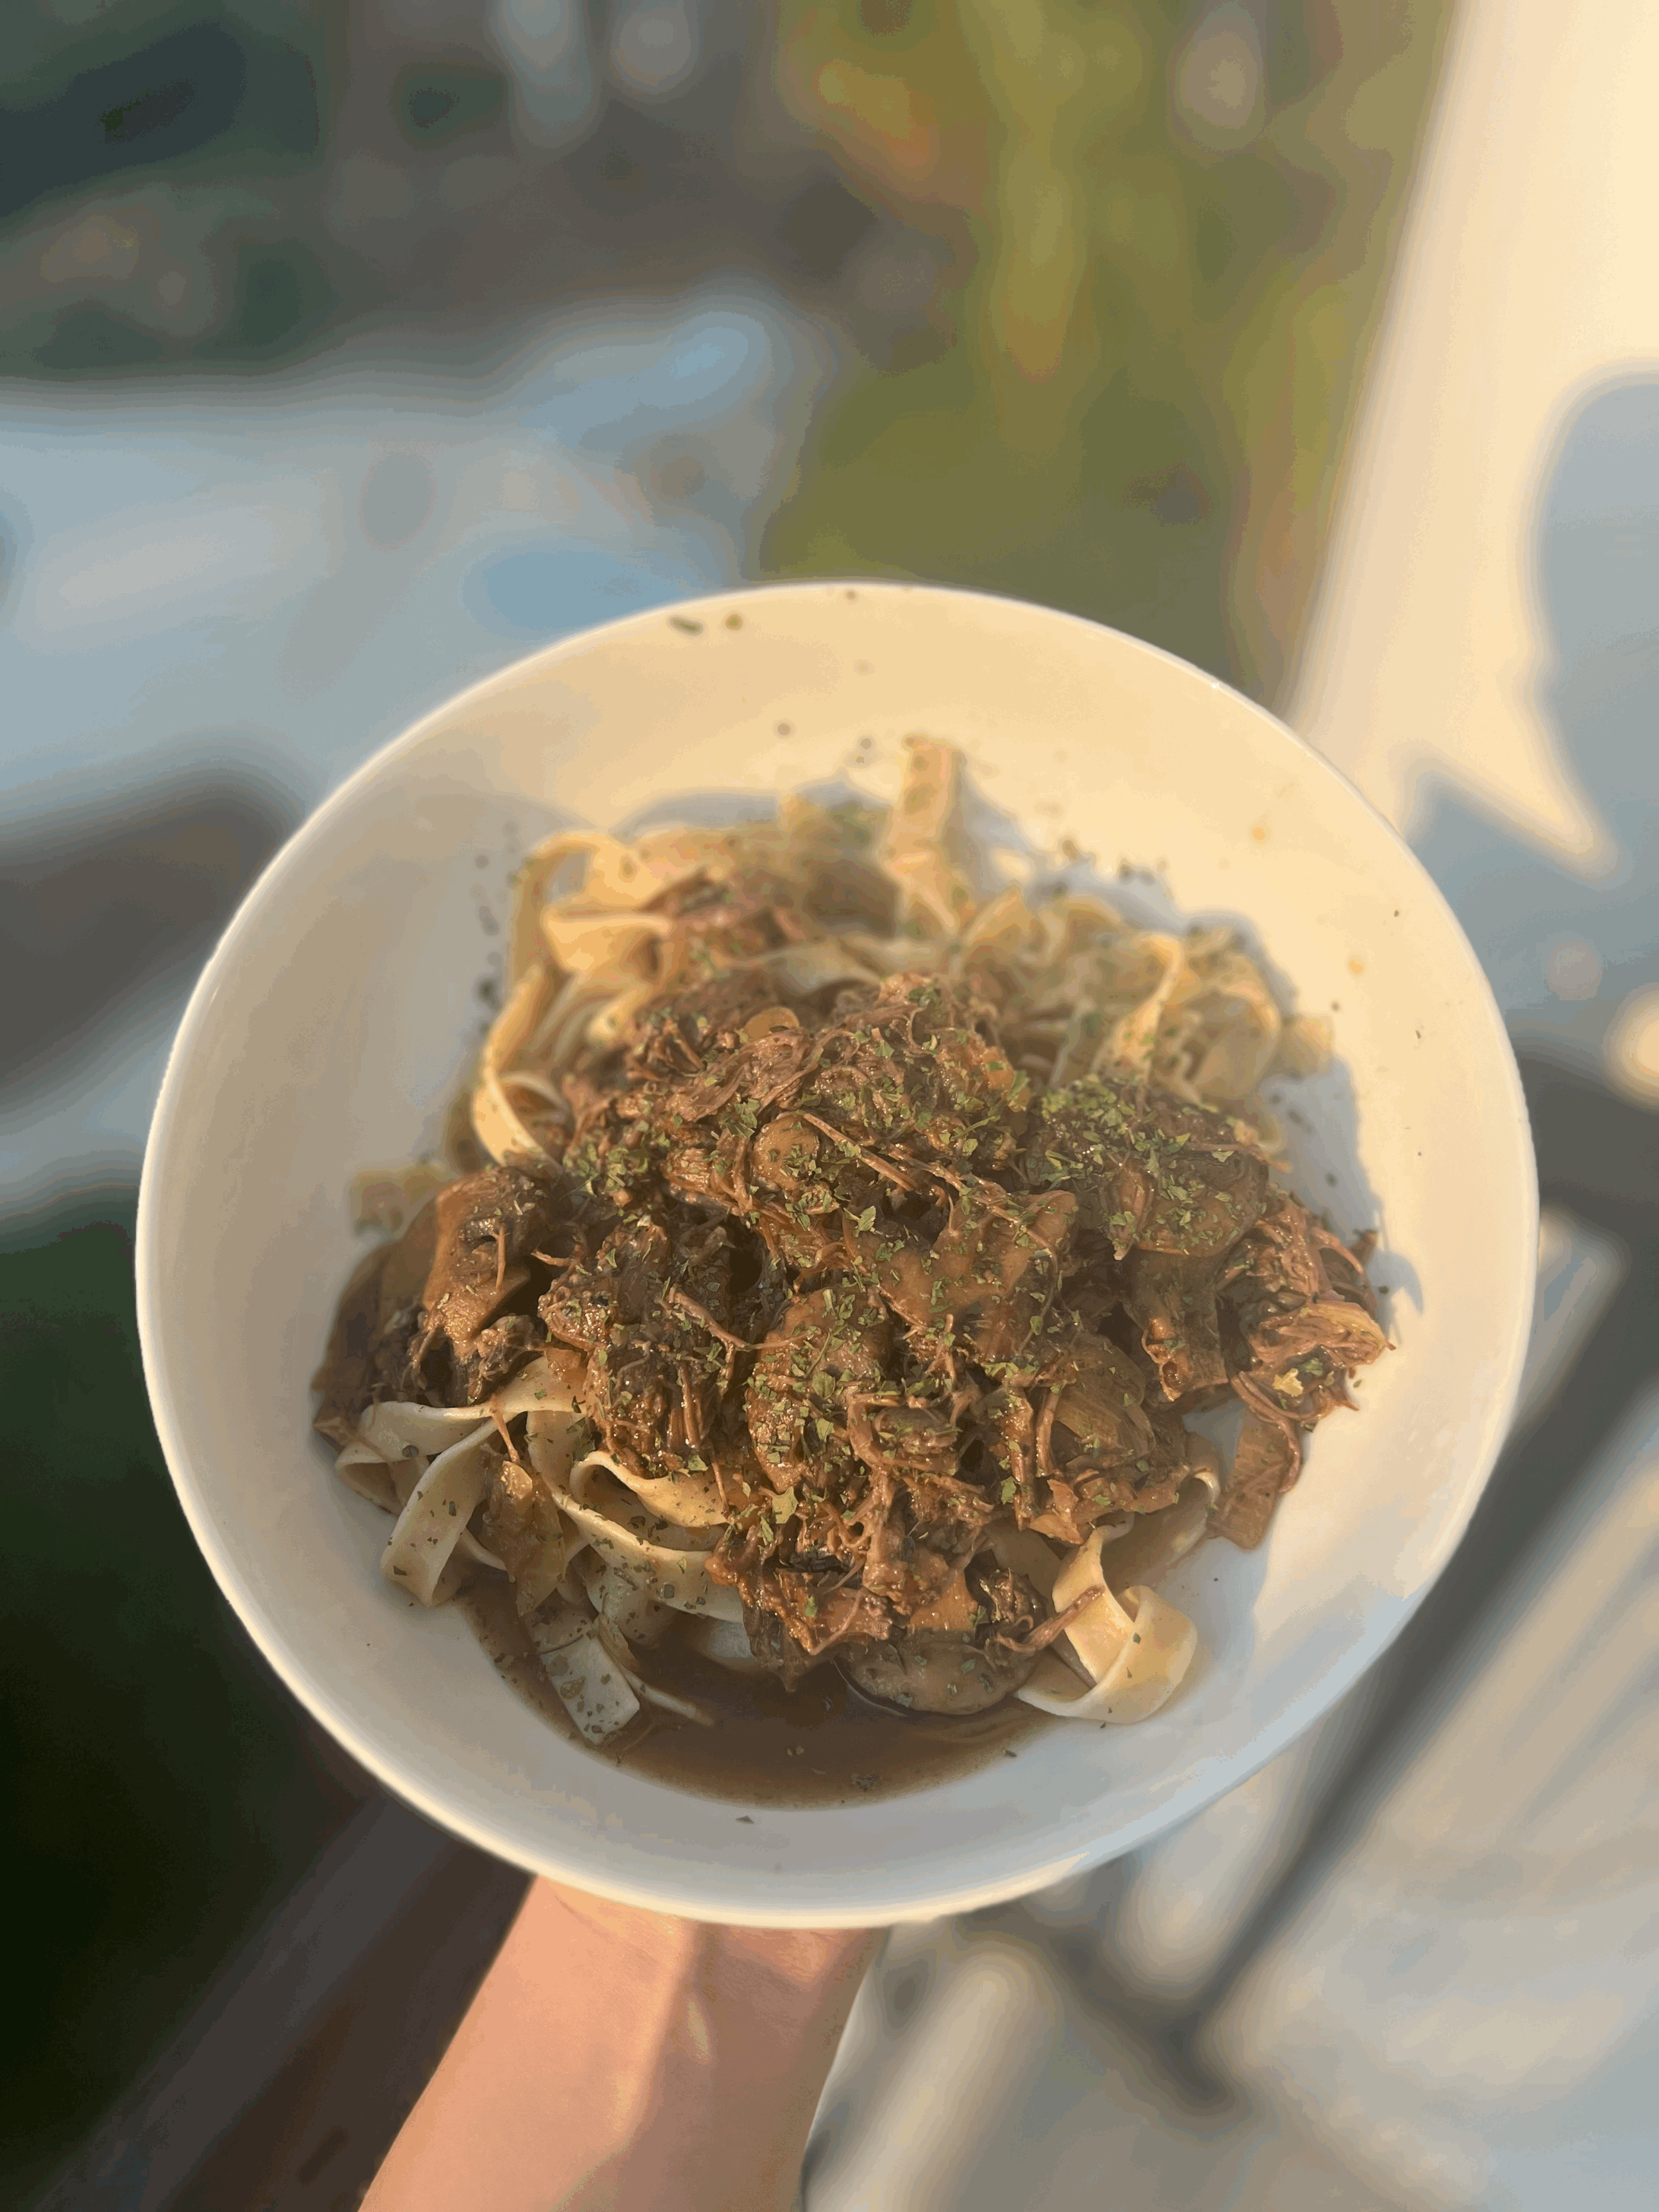
Father’s day fest
Easy Slow -Cooker Beef Short Ribs
One of the things I really dislike about food blogs is how long it takes to get to the recipe. I have said this before but I will say it again: We DO NOT need the backstory to Beef Short Ribs, Sheryl.
We want the recipe and NOT carpal tunnel from scrolling. But for those who care for a little backstory, I made this for my dad who loves hamburger helper and beef stroganoff. I wanted to upgrade those dishes and makes it “fancy” but not tooooo crazy expensive or laborious for father’s day. I sat poolside while this thang cooked for me in the slow cooker. Anyways, here’s the recipe!!!!!
Beef Short Ribs with Gluten Free Egg Noodles
- 3lbs of beef short ribs
- Salt & Pepper
- 2 tablespoons of Extra Virgin Olive Oil
- 1 cup of dry sherry (O Vinegar’s Aged Sherry is really good)
- 2 Shallots (roughly chopped)
- 3 cloves of garlic (smashed and peeled)
- One pack of cremini mushrooms (I did pre-sliced & whole)
- 4 cups low sodium Beef Stock
- A little drizzle of balsamic (balsamic glaze also works, I find it cuts through the acidity & fat)
Seasonings:
- 1 bay leaf
- 1 tablespoon of French Onion Seasoning (Liptons)
- 1 tablespoon of Beef Stew Seasoning (Liptons)
- 1 teaspoon of Trader Joe’s Mushroom Seasoning
- 1 teaspoon of garlic powder
- 1 teaspoon of onion powder
1. Heat EVOO in a dutch oven (or pot) on the stove to medium-high heat.
2. Pat beef short ribs dry & season with salt & pepper & some garlic and onion powder
3. Sear short ribs in dutch oven for about 2 minutes on each side
4. Set seared short ribs to the side.
5. Deglaze dutch oven (or pot) with dry sherry cooking wine until reduced by half (about 2 minutes).
6. Add seared short ribs and dry sherry cooking wine to Slow Cooker
7. Add beef stock, seasonings, balsamic, and veggies (mushrooms, garlic and shallot) to the slow cooker and toss!
8. Once mixed, put lid on and set slow cooker to high for 4 hours
9. After 4 hours of high temp, you can lower to slow for the last 2 hours (if needed)
10. Slowly pull the tender meat from the bone (honestly will fall off the bone with no problem or trouble)
11. Cook pasta according to box, drain, then toss with beef. Garnish with dried parsley, if ya like :)
12. Enjoy! You can add parm if ya are feeling cheesy!
I hope y’all try this recipe out, because I thoroughly enjoyed it and I think it’s perfect for any date night or special occasion. There’s an ease to this dish that I think anyone who works and hates washing dishes will enjoy.
Cheers!
- Grrupa

Peachy keen: peach galette
slice, sprinkle, bake, and enjoy a delicious peachy galette
Hey y’all! I wanted to share this peach galette recipe I made last weekend. It was delicious! It had a flakey and buttery crust, juicy peaches, a sprinkle of sweetness. a true rustic southern delight.
In a world filled with recipe creators who take you on a journey longer than a saga in a cookbook, I'm here to serve you the good stuff without the fluff. Who has the time to read a novel? While others wax poetic about the origin story of each ingredients, I'll cut to the chase. I’m not going to make you scroll until you get carpal tunnel or explain how I made this peach galette for my fiancé in Bora Bora in 2003.
So, no need for a novel before a recipe—just the essentials, served straight up. That’s Grupa Cooks.
So, grab your apron and let's dive into the deliciousness without the extra words. Because life's too short for a culinary dissertation before dinner, and my ADHD is way too under medicated to read through the Bora Bora story.
The recipe is based off Natasha’s Kitchen (https://natashaskitchen.com/peach-galette-recipe/)
Ingredients:
Peaches - white or yellow peaches both work, but yellow peaches add a touch of charm to the galette. No peeling required.
Sugar - adjust based on sweetness
All-purpose flour - Adds thickness to the peach juices.
Cinnamon - classic pairing with peaches, but cardamom offers a unique twist.
Pure vanilla extract and vanilla bean paste - Opt for the real deal, not imitation.
Unsalted butter - Stick with unsalted for baking.
Lemon paste - adds a unique flavor, hard to find but worth it
Pastry Dough - A blend of flour, sugar, salt, cold butter, and ice water creates a flaky, buttery crust.
Her recipe states:
Form the crust – Preheat your oven to 425°F and set the dough onto a floured sheet of parchment paper. Use a rolling pin to roll the dough into a 12-inch circle. Slide the parchment paper and dough onto a rimmed baking sheet and refrigerate.
Make the peach filling – Stir together flour, sugar, and cinnamon in a small bowl. Slice the peaches and place them in a medium bowl. Sprinkle the peaches with the flour mixture, then stir in the vanilla.
Add the peaches to the crust – Arrange the peaches in a circular pattern over the dough, starting from the outside and working towards the center. Leave a 2-inch border. Dot the tops of the peaches with butter.
Finish – Fold the border up over the peaches, pinching together the overlapping edges and patching any cracks or holes in the dough. Brush the crust with the egg wash, then sprinkle the coarse sugar over the top.
Bake – Place the baking sheet in the oven and bake for 25 to 30 minutes, or until the crust is golden brown and the peach juices are syrupy. Let the peach galette rest for 15 minutes, then serve.
What I added that was different:
lemon paste, adds acidity without extra liquid
almond paste, I added the almond paste to the bottom of the galette before I placed peaches to prevent a soggy bottom
started with 425 degrees but switched to 350 towards the end.
Welcome to grupa cooks
Grupa Cooks: Where every dish is a story, crafted with love and Southern charm. Join us for unforgettable culinary experiences that nourish the soul and celebrate the joy of cooking
Hello and welcome to Grupa Cooks! I'm Chandler Dent, the culinary enthusiast behind this flavorful journey. From my kitchen to your screens, I am thrilled to share my love for baking, cooking, and crafting recipes with all of you.
As I embark on this delicious adventure, I invite you to join me in exploring the art of creating memorable meals that are not only a feast for the palate but also a celebration of everyday joys. Whether hosting supper clubs, curating menus, or simply finding delight in crafting bites that bring smiles to others, my passion for food and hospitality knows no bounds.
Through this blog, I aim to share my experiences, recipes, and culinary inspirations with all of you. Join me as we embark on a culinary journey filled with flavors, stories, and the shared love of good food.
Stay tuned, and let's savor the moments together at Grupa Cooks!
Looking forward to sharing more with you all in the kitchen!